

I haven’t talked about Luminar neo in a while due to a few issues with the software being slow, However that appears to be fixed in part thanks to an Intel Grpahics driver update. Last Time I posted about Luminar Neo I mentioned the portrait background removal. It’s now even simpler and quicker, so i thought I’d show you that and then adding in the simplicity of replacing the background altogether. FYI Skylum have a special on that runs till 30th January. You can find out more and get an additional discount by going to Skylum Neo.
Tag: editing
-

Luminar Neo Updates and Extensions
Been a while since I mentioned Luminar Neo. Well they (skylum have very busy)
Let me give you a brief rundown on what they have to this forever improving photo editing software
Portrait Background Removal
Now you can select a human in your photo and automatically remove the background behind them — no tedious editing required. Achieve precise selections, enjoy a smart refinement brush, and save the portrait as a separate PNG file to use as you please. You can find this feature within the Masking options. It’s time to spark your creativity!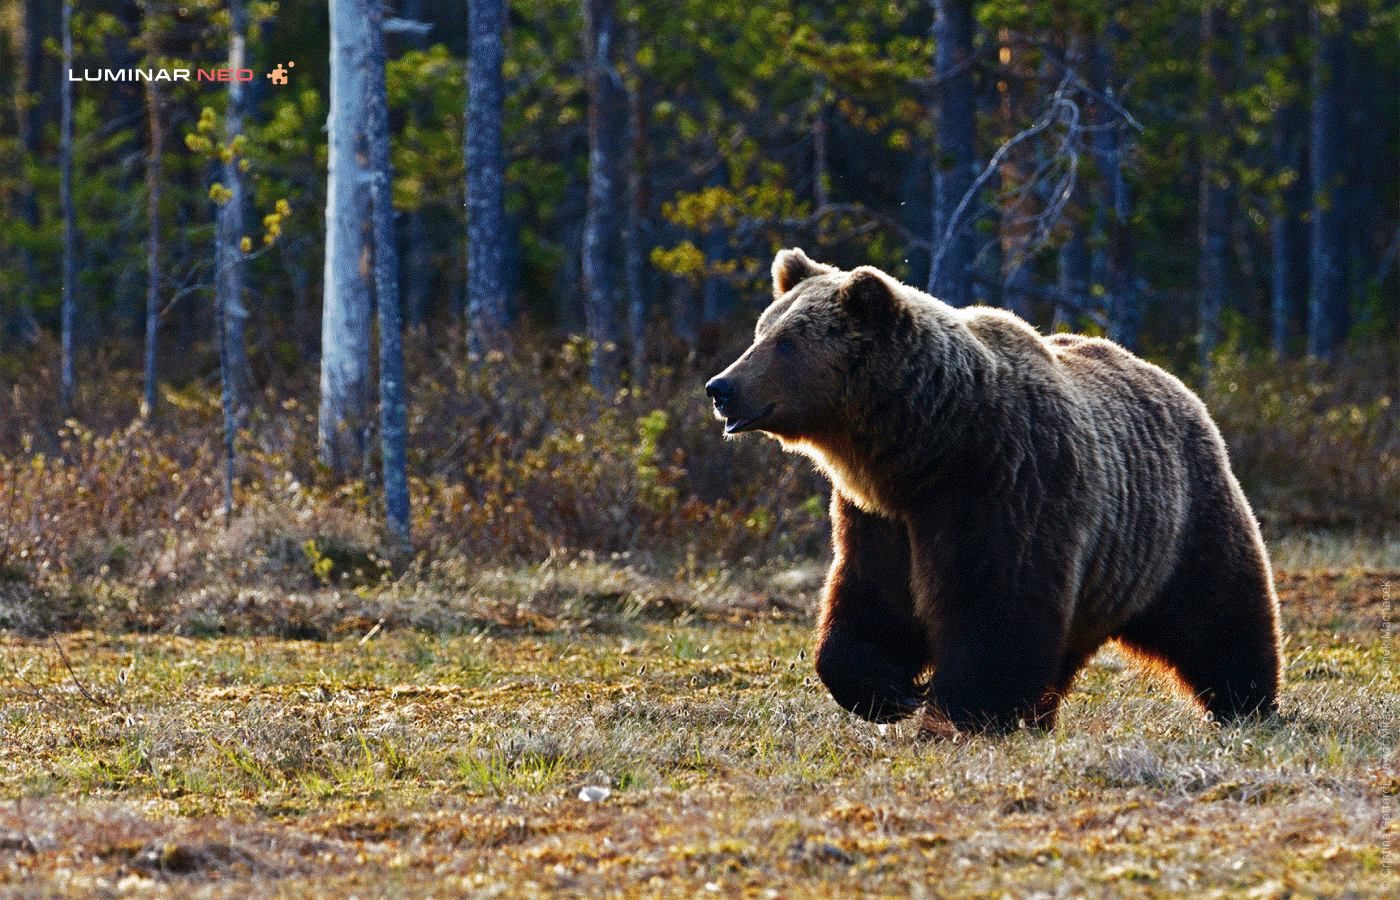
Extensions
In Luminar Neo 1.2.0 Update, extensions were introduced — paid professional features that expand the capabilities of Luminar Neo. The first extension they releasing was HDR Merge, which can merge up to 10 exposure-bracketed images into a single HDR photo. HDR Merge delivers a spectacular level of color enhancement, making the final result look as close as possible to what the human eye can see.
Noiseless AI Extension
Luminar Neo 1.3.0: Update Noiseless AI Extension was introduced
Noiseless AI, a new paid Extension for easily achieving professional results. Based on deep photo analysis, Noiseless AI determines the level of noise in a photo and suggests one of three noise reduction options — Low, Middle, or High — that can be applied in a click. You can also adjust the noise reduction level manually. Furthermore, the Luminosity, Color, and Details sliders give you even more control over the results.Clone Tool
Luminar Neo Update 1.4.0. Now Luminar Artists can use the long-anticipated Clone tool in their editing. Extensions are also improving: the HDR Merge Extension now gives results with reduced chromatic aberrations.Plus of course they have improved some more technical and basic proceess’s
If you haven’t got it yet then I belive the present prices go up on 29th September so grab a copy or subscription by going here.
Share this:
-

Luminar Neo Update 1.0.6
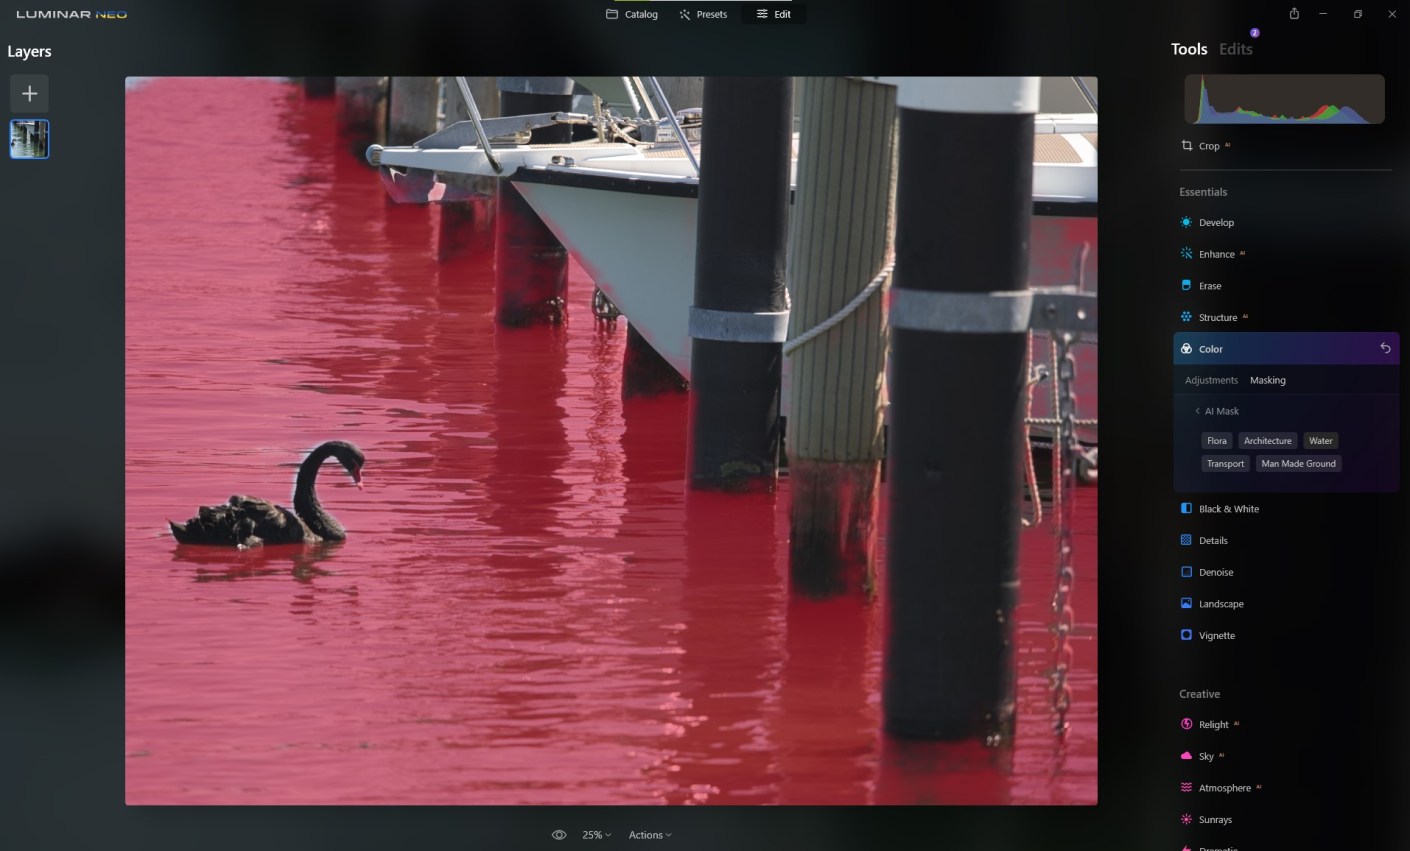
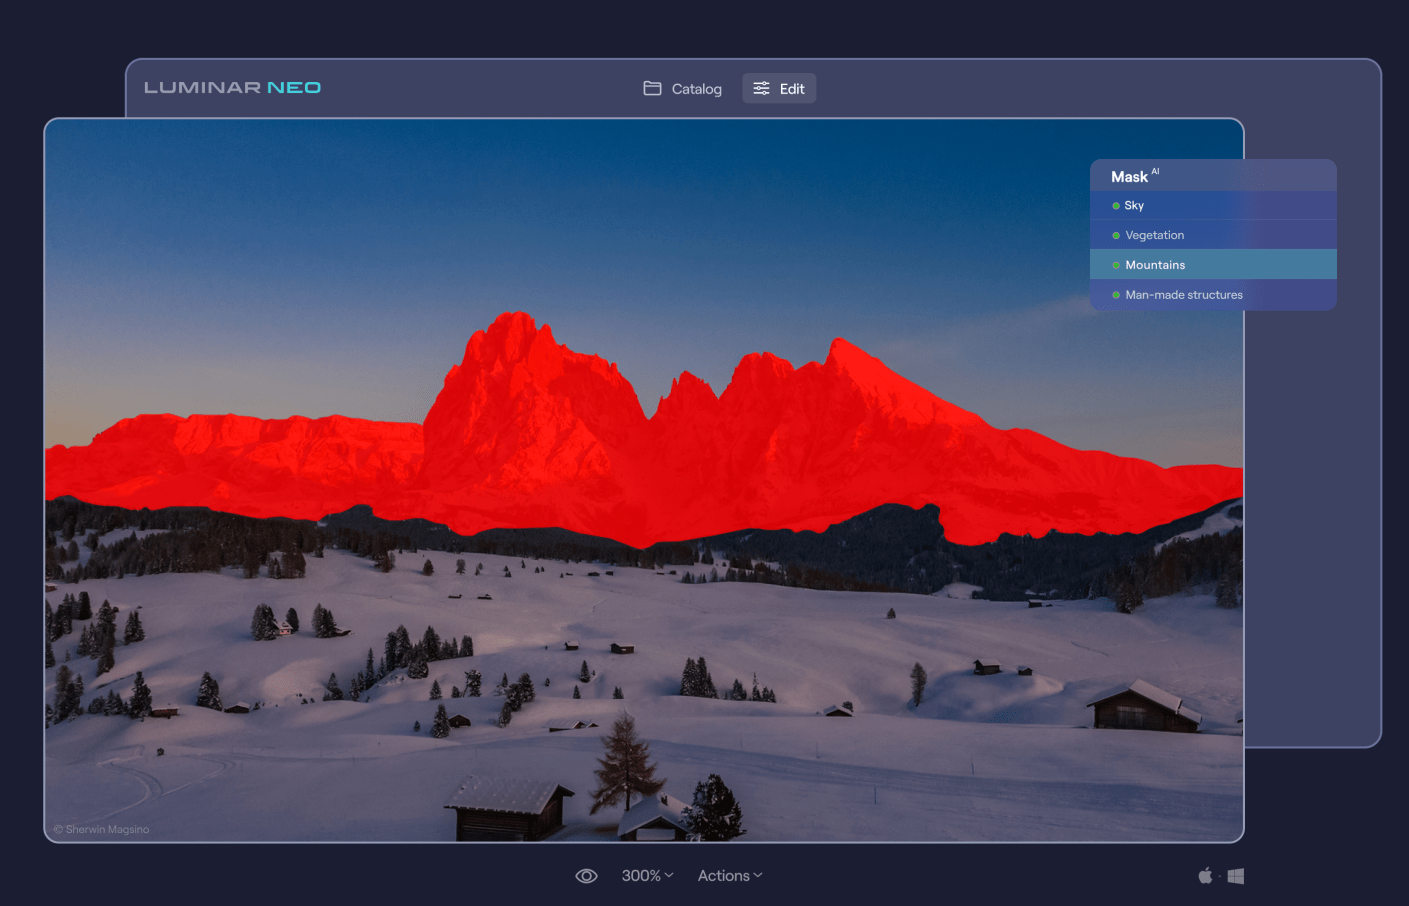
Skylum has released a new update to Luminar Neo. The 1.0.6 update includes Mask AI and Histogram Let’s check it out:. Mask AI The major feature of this update is the long-anticipated Mask AI technology. The powerful neural network behind Mask AI detects up to 9 separate elements in a photo: people, skies, architecture, transportation, water, flora, mountains, natural ground, and artificial ground. What’s more impressive, is that you can automatically mask the desired area with just one click of a button. The AI will find the desired area and mask it up for you, without needing to spend time fussing over the details with a masking brush. After applying a tool to the masked area, you can easily copy and paste the adjustments to other images, and the mask will apply adjustments only to the same masked area of the other image – be it a sky, a building, a person, and so on. On top of that, you can use the manual Gradient and Radial masks. Plus, the new interface makes it easier and more enjoyable to work with masking. Histogram The histogram is a tool that can be a great help while correcting colours or adjusting exposure, and it’s is now available for. A histogram is a graphical representation of the tonal values of your image. In other words, it shows the number of tones of a particular brightness found in your photograph, ranging from black (0% brightness) to white (100% brightness). It’s a great tool that will help you produce well-balanced images. Now you can press the J hotkey to toggle clipping indicators on and off and see clipped pixels. To coincide with this update Sklylum have Neo on special ‣ One-time purchase: Luminar Neo 2 seats instead of 1 for US$79 ‣ 1-year subscription Luminar Neo 2 seats instead of 1 for US$59. ‣ And a special offer for those who have already had Skylum products: Luminar Neo 1 seat for $54 plus free Film Grain textures. You can access these here
Share this:
-

Luminar Neo Update 1.0.4 and Help Ukraine

You got to hand to those guys at Skylum! They are working in war zone in the Ukraine, in case you didn’t know, and somehow with all the horrible things going on around them they managed to put together the latest update for Luminar Neo. If you haven’t yet bought Neo then check out the following pieces I’ve done Luminar Neo The Game Changer and Travel Beyond with Luminar Neo additional you go here to learn about Luminar AI another Skylum product. Purchasing any of Skylum’s software helps support Ukraine in their struggles against Russia. Go here for that.
You can also read more about helping at https://skylum.com/blog/act-now-save-ukraine-defend-democracy-24Anyway, what’s the latest update for Neo got?
Well this is not an extensive list but the main points are:
Use Smart Objects in Luminar Neo as a Photoshop plugin
Connect more smoothly to Luminar Share
Get better visibility with a more distinct color for masking
Sync and load an image in single image view and see the correct aspect ratio
Work with Iris Flare on large images
Log in through a Google, Facebook, Apple ID, or Microsoft account without launching in trial mode (windows only)
Remember purchasing any of Skylum’s software helps support Ukraine in their struggles against Russia. Go here for that.
Share this:
-
Pixbim Object Remover
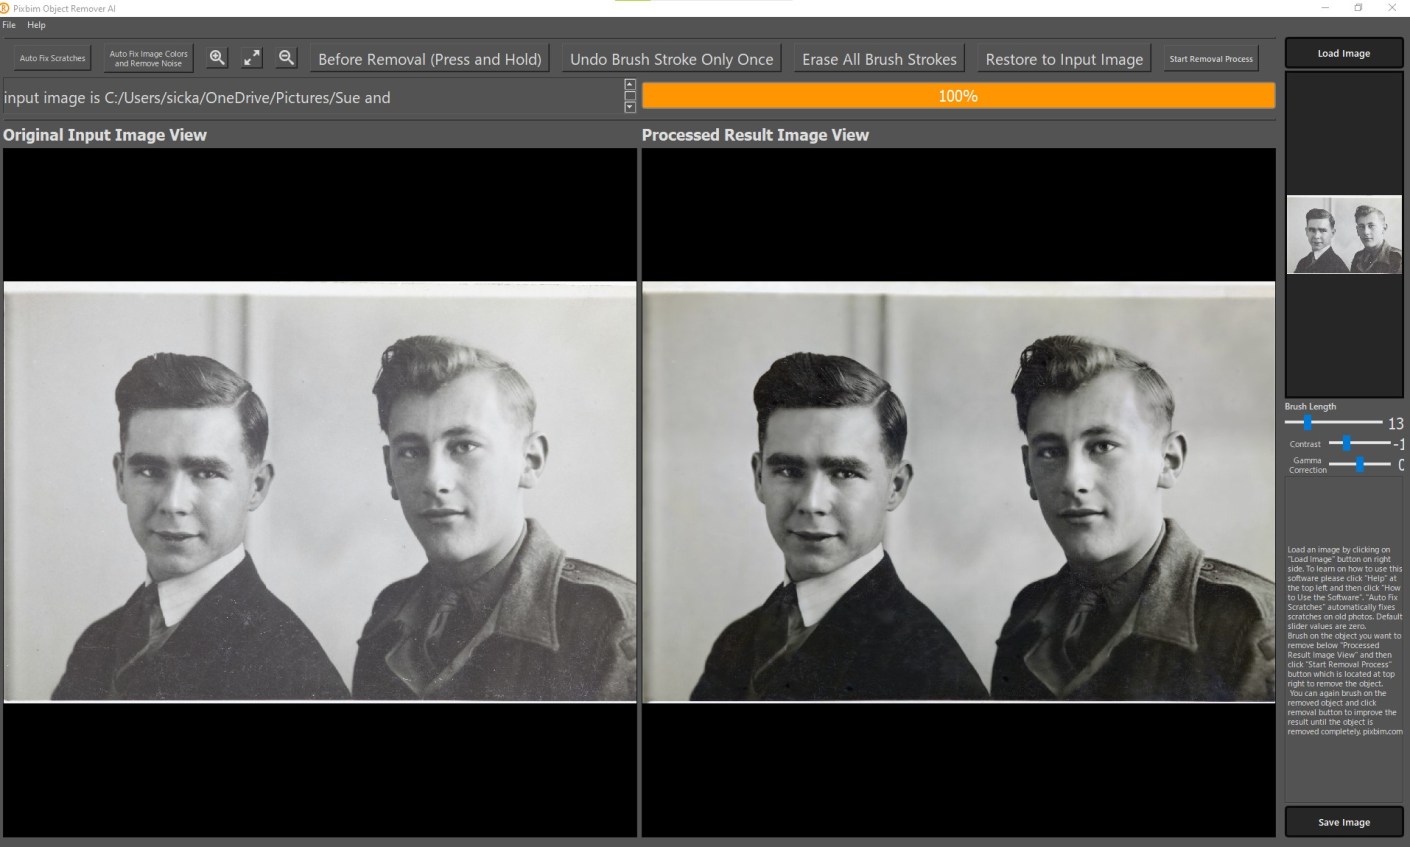
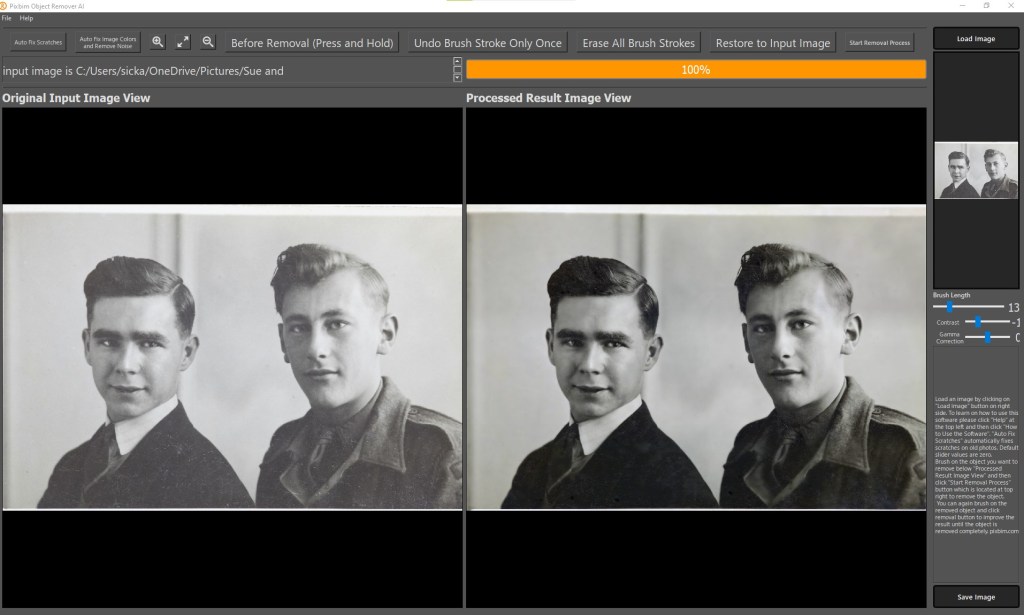
Pixbim Object Remover Been a while since I posted any Pxbim editing software reviews. I’ve introduced you to Color Surprise AI and Unblur Shake AI but they also have Animate Photos AI New, Enlarge AI, Video Colorize AI and what I’m about to show you, Object Remover AI. This one is a little different as I don’t use it for object removal, I have other software such as Luminar Neo or AI and Photoshop for that. What it is good at however, is removing scratches from old photos as you can see from the above screen shot. This video runs through the fairly simple process of removing scratches.
Pixbim Object Remover If you want to get a copy of this go to Pixbim Object Remover and you’ll get a 20% discount off the current discounted price of US$37.99 if you use my code KATINCSAI20. For this price you can’t go wrong if your are looking for an easy way of cleaning up old photos.
Share this:
-

Travel Beyond with Luminar Neo
02/02/2022 UPDATE THIS OFFER HAS NOW EXPIRED BUT YOU CAN STILL GET LUMINAR AI AT A REALLY GOOD PRICE USING THE LINKS BELOW.
The big release of Luminar Neo comes up in February.
So if you haven’t yet pre-ordered your copy you have another opportunity to buy before then at discounts up to 66% off on Luminar Neo and get this, LuminarAI and Aurora HDR.
They are calling it the “Travel Beyond” offer and it also includes the some great template packs with their software in bundles or separately. The sale starts on January 26, 2022 (Australia Day for us Aussies) and ends: January 31, 2022
I haven’t been able to show you everything about Neo yet but here’s some images below to show what else there is:
Portrait Background Removal AI
This looks terrific. The ability to change backgrounds in portraits with just a couple of clicks has great potential for portrait photographers

Portrait Background Removal AI Mask AI
One click masking of objects that have been identified by the software. Sounds crazy!
Mask AI Luminar Share
Luminar Neo has pretty easy way to share images from the desktop software to your smartphone.

Luminar Share So the offers in USD are as follows:
Luminar Neo offer:
1 seat:
Luminar Neo + 1 Free Pack – 30% discount: $69
Luminar Neo + LuminarAI + 1 Free Pack – 45% discount : $98
Luminar Neo + LuminarAI + Aurora HDR + 1 Free Pack – 61% discount: $108
2 seats:
Luminar Neo + 1 Free Pack – 25% discount: $89
Luminar Neo + LuminarAI + 1 Free Pack – 41% discount: $128
Luminar Neo + LuminarAI + Aurora HDR + 1 Free Pack – 56% discount: $138
You need to go here for this offer
If you haven’t got LuminarAI or Aurora (HDR) yet then they have this offer:
1 seat:
LuminarAI + 1 Free Pack – 52% discount: $47
LuminarAI + Aurora + 1 Free Pack – 66% discount: $67
LuminarAI + Luminar Neo + Aurora HDR+ 1 Free Pack – 61% discount: $108
2 seats:
LuminarAI + 1 Free Pack – 50% discount: $59
LuminarAI+ Aurora HDR + 1 Free Pack – 64% discount: $79
LuminarAI + Luminar Neo + Aurora HDR + 1 Free Pack – 56% discount: $138
You need to go here for this offer
These are pretty big discounts which when you consider Neo is due our next month are very generous.
So what are you waiting for?
Share this:
-

Luminar Neo The Game Changer
As you may or may not know I’m an affiliate for Skylum who make some great editing software including that of Luminar AI – go to the link below for more on that.
I wouldn’t promote them if I didn’t use and like their software.
Well, they are releasing a new editing software called Luminar Neo that I think is a game changer. It’s aimed at the photography enthusiast, semi pro or pro who wants to have complete control but also want some of the more mundane tasks done with one click.
As a comparison Luminar AI is aimed at those photographers who really want to edit their photos quickly but at the same time want to be able to tweak.
Some (certainly not all) of the features are removal of dust spots, relighting, sharing to your mobile device, background removal, portrait bokeh which you can see on one of the links below in Luminar AI, and what I’m about to show you, removal of powerlines in one click.So if we go into an image and then click on edit followed by erase. Now we have a drop down menu and second from the bottom is “Remove Powerlines”. Click on that and watch the magic.
While you’re watching let me show you another tool that I have a demo for. Again click on the image then edit and then “Relight”. Another menus appears where you can control the level of brightness for both the foreground and background and then adjust the depth of the adjustment from the front to the back. Easy!It’s not due for release until February 2022 but at the moment they are taking preorders for around US$60 for a single licence which is a $20 saving. But it’s only available for the next 2 days. Go to Luminar-neo before it’s too late.
For more on Luminar AI go here. To see the portrait bokeh specifically in action on Luminar AI go here.
Share this:
-

Luminar AI Update 4 and Portrait Bokeh
If you been sitting on the fence about buying this editing software, then this could be a game changer for you.
Luminar AI’s fourth update gives us Precise Horizon Control in Sky AI, Improved Textures with visual preview and here’s the real deal breaker, Complete focus control with Portrait Bokeh AI.
So what does that all mean? Well let’s get the minor upgrades out of the way:
Precise Horizon Control in Sky AI
A new on-screen tool makes it even easier to control positioning of new skies when performing sky replacements with the Sky AI tool. In the Sky Orientation controls three sliders have been replaced by a single, intuitive Horizon Position control which makes accurate sky alignment easier for any of us.
Improved Textures with visual preview
You can now visually browse Textures in the dropdown list just like you can with Sky Selection and instantly have an idea of what your result might look like.
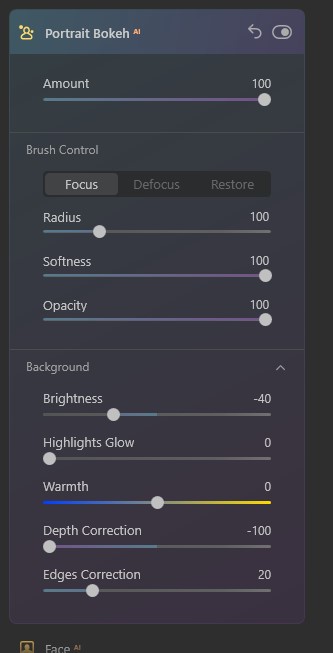
Now let’s talk about Portrait Bokeh AI
For those that are not familiar with the term Bokeh, it’s the blurriness you find in the background of a photo. For more about this go to https://en.wikipedia.org/wiki/Bokeh
Traditionally, creamy bokeh has always required expensive cameras and lenses. And has always been the main domain of full frame cameras.
There are ways of creating it with mirrorless and crop frame camera. And I know the iPhone and Android mobiles have software that can create it. Plus, you can go to Photoshop and create it too.But Luminar AI’s Portrait Bokeh AI is something else.
Using artificial intelligence, Luminar AI can recognize people in a photo – even groups of people, and people posed in unusual positions. And then will automatically generate bokeh to a certain point, then it’s entirely controlled by you with a single amount slider. This allows you to create beautiful background blur in seconds – adding realistic and dreamy 3D bokeh effects to your portraits.
Lets’ take a look at it in practice.
Here’s one I took on a shoot that the client wanted me to shoot these employees in front of this tree. On the review of the pictures, they wanted a blurry background. Well, they were really to close to get the a strong bokeh effect. And I wasn’t about to retake it a few days later, so I did attempt it in photoshop and gave up. I just don’t have the time, attention to detail and to be totally honest the enthusiasm to spend an hour or 2 on one image.

So, let’s see how we go with Portrait AI
Go into edit mode then scroll down to the portrait section. The first section is portrait AI
Once you open that, you get straight into the first and important slider “amount”. Now you can see by moving this, you get a good control of the bokeh. Lets’ slide right over and see what happens. Pretty good.
The way it works is that it automatically masks humans (and just so you know it doesn’t work on anything else – yet).
So you are able to get some control of the mask with the brush control but I’m going to go down to the background section and slide the depth correction over to see if it helps blur the bottom of the planter box that is still in focus.Now we can go back to brush control and tidy it up.
Boom done.
To me that’s more than impressive that’s something every photographer has wanted in their armour for decades.
So, if you are still not sure about buying this software Luminar AI Portrait Bokeh should convince you. And that to the many more AI updates they have planned and you’ll have a great product to make your editing life so much easier.
Go to Luminar AI to grab it and make your life a lot easier when editing photos.
Share this:
-

Pixbim Unblur Shake AI
Pixbim have a new software called Unblur Shake AI. As it sounds it reduces the blur in a photo.
See the video to watch it in action or scroll down for more info.
Ready to get now? Go to Unblur Shake AI enter the code KATINCSAI20 for a discount
So why should you care?
Well there would have been times when you took a photo whether it be with a mobile, DSLR, or mirrorless camera, and found that when you enlarged it looked blurry.
The most common form of blur is caused by camera shake, which for those who don’t know, is when you have taken a handheld photo with a shutter speed that’s too low for the light available or the photographer just hasn’t kept the camera still. Very common with mobile images.
There are other types of blur of course. Not being in focus is one kind. Motion is another.So, if this has happened to you then you’ll like this program which can fix the majority of images that have blur. Although it struggles with bad blur and motion blur (a speeding car for example).
Let’s take a look.
First you open the program and then click on the “load Image” button, select a photo and ‘boom’ the magic starts.
Straight away it starts analysing the image and quite quickly previews the results.
Once the preview is loaded you can see another part of the image by going to the preview panel and moving the red square.The buttons at the top (the magnifying glass and the double arrow) don’t work very well or maybe it’s just my copy. But they’re irrelevant anyway.
There is also a an “Unblur Factor” slide that allows you to increase the process. At this stage there are only 2 settings “Low”, the default setting, and “High”. Setting it to high is going to take longer and sometimes can be too much.
If you are happy with the result, just click on the “start process full image and save”. A window will pop up asking you to save it to a location of your choice with the same file name plus “unblurSAI_result”
One last thing, the image formats you can use with exclude raw and psd files. I’ve only tried tiff, png and jpeg images so I’m not sure if you can use other non-raw files.
Look it’s not fancy but at US$34.99 less 20% if you use my code KATINCSAI20, I think it’s steal and a great tool for photography enthusiasts. It’s a once off purchase with free updates for life.
Go to Unblur Shake AI to grab this and enter the code KATINCSAI20 for a discount
Share this:
-

Luminar AI Update 3 Reminder
This is your last chance to get a special deal on the this easy to use software. Go to Luminar AI Update 3 for more info on the software.
See below to go get it.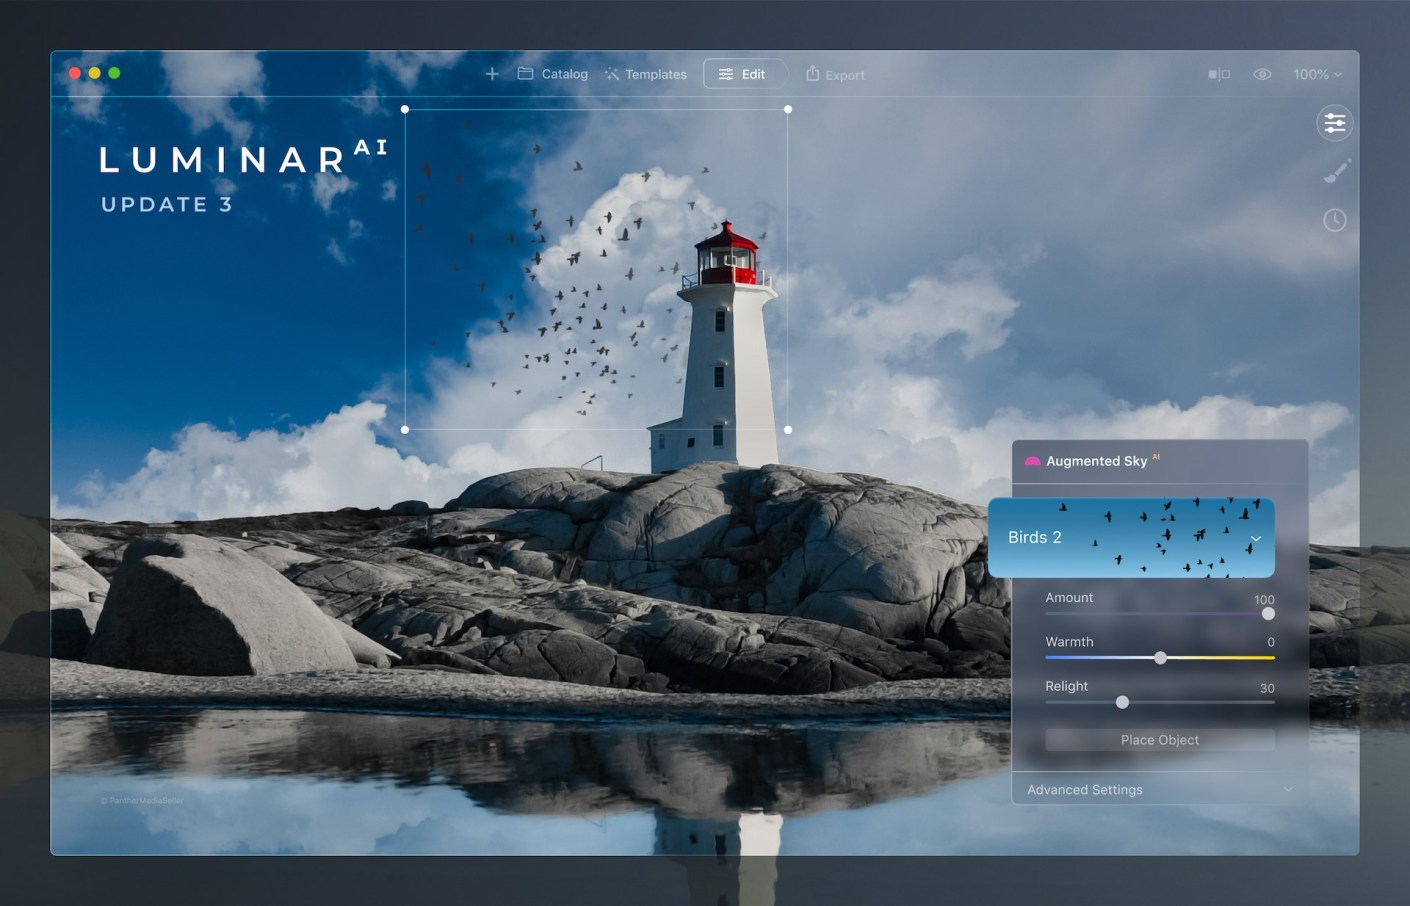
Luminar AI Update 3. Click on the image for the discount. If you don’t have a copy of this software – now is the time to get it at a 25% discount.
Go to July 1 – 9th sales.
That’s right you’ve only got today and tomorrow to get LuminarAI at this discount.Share this:
-
Luminar AI Update 3
There is now a third free update to LuminarAI that brings new benefits to the AI-powered editing tool.
These are the changes you should find useful especially if you use it a lot to improve the skies in your images.
Picture-perfect horizons with the improved SkyAI tool
In Update 3, there’s been significant improvements to the SkyAI tool:
Better Sky Detection
Once a new sky is selected, SkyAI now uses improved horizon detection to place it more accurately in the scene. The new sky is automatically adjusted to better match the perspective of the photo. Refined edge detection and masking are used to better integrate the new sky for a more organic effect.
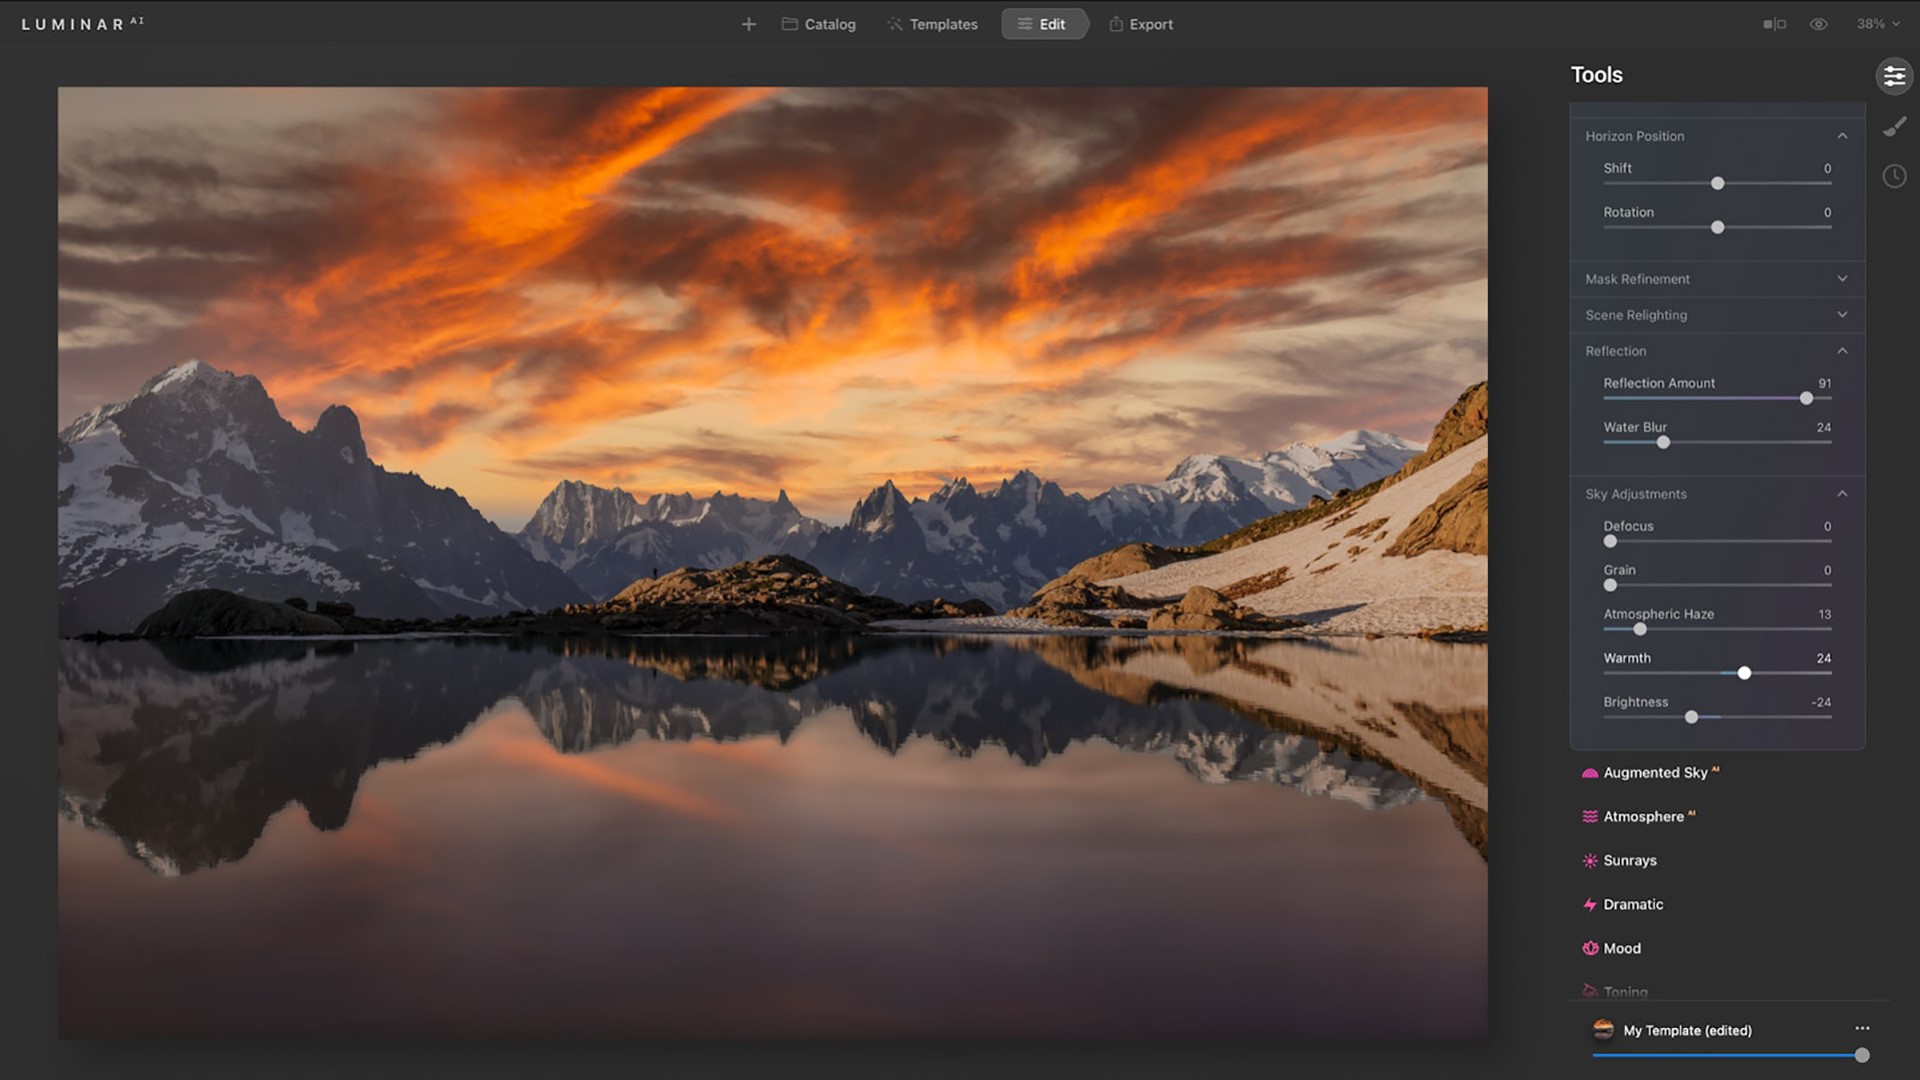
Horizon Position & Sky Orientation
When replacing the sky in previous versions of LuminarAI, it could be difficult to realistically align the new sky with its reflection in the water. This was because the Vertical Offset slider controlled the alignment of both the sky and the water reflection, moving them in the same direction.
Now, you can replace the sky and set the desired position of your horizon line thanks to the Shift slider in the Horizon Position section of the SkyAI tool. If the horizon is tilted, you can take advantage of the Rotation slider.
You can then use the Vertical Position slider in the Sky Orientation section to further adjust your image. This slider controls the position of the new sky in both the sky and water areas but moves them in opposite directions in relation to the horizon line until you get the ideal match between your new sky and its reflection.
Better Reflections

The Sky Adjustments section in SkyAI is where you can easily adjust the new sky to refine Atmospheric Haze, Warmth, and Brightness. These controls let you precisely adjust the mood of the sky and match it to your scene… and now to your reflections too! With the Sky Adjustments tools, you can precisely colour grade and tone your photos with great flexibility.
Plus, you can now add a realistic Water Blur to the reflections in your image. This lets you better match reflections when the water surface has waves or ripples.
Better Relighting

Improvements in colour accuracy create a more natural effect when the new sky is used to automatically relight the entire scene, including reflections. Three relighting controls allow you to fine-tune the lighting to fit your creative vision.
As soon as you replace the sky, the water is instantly relit. This gives you the ability to replace a daytime sky with an evening sky or a simple sky with a dramatic one.
LuminarAI calculates the correct reflection in the water and matches lighting across the whole image.Fantastic worlds in your skies with Augmented SkyAI
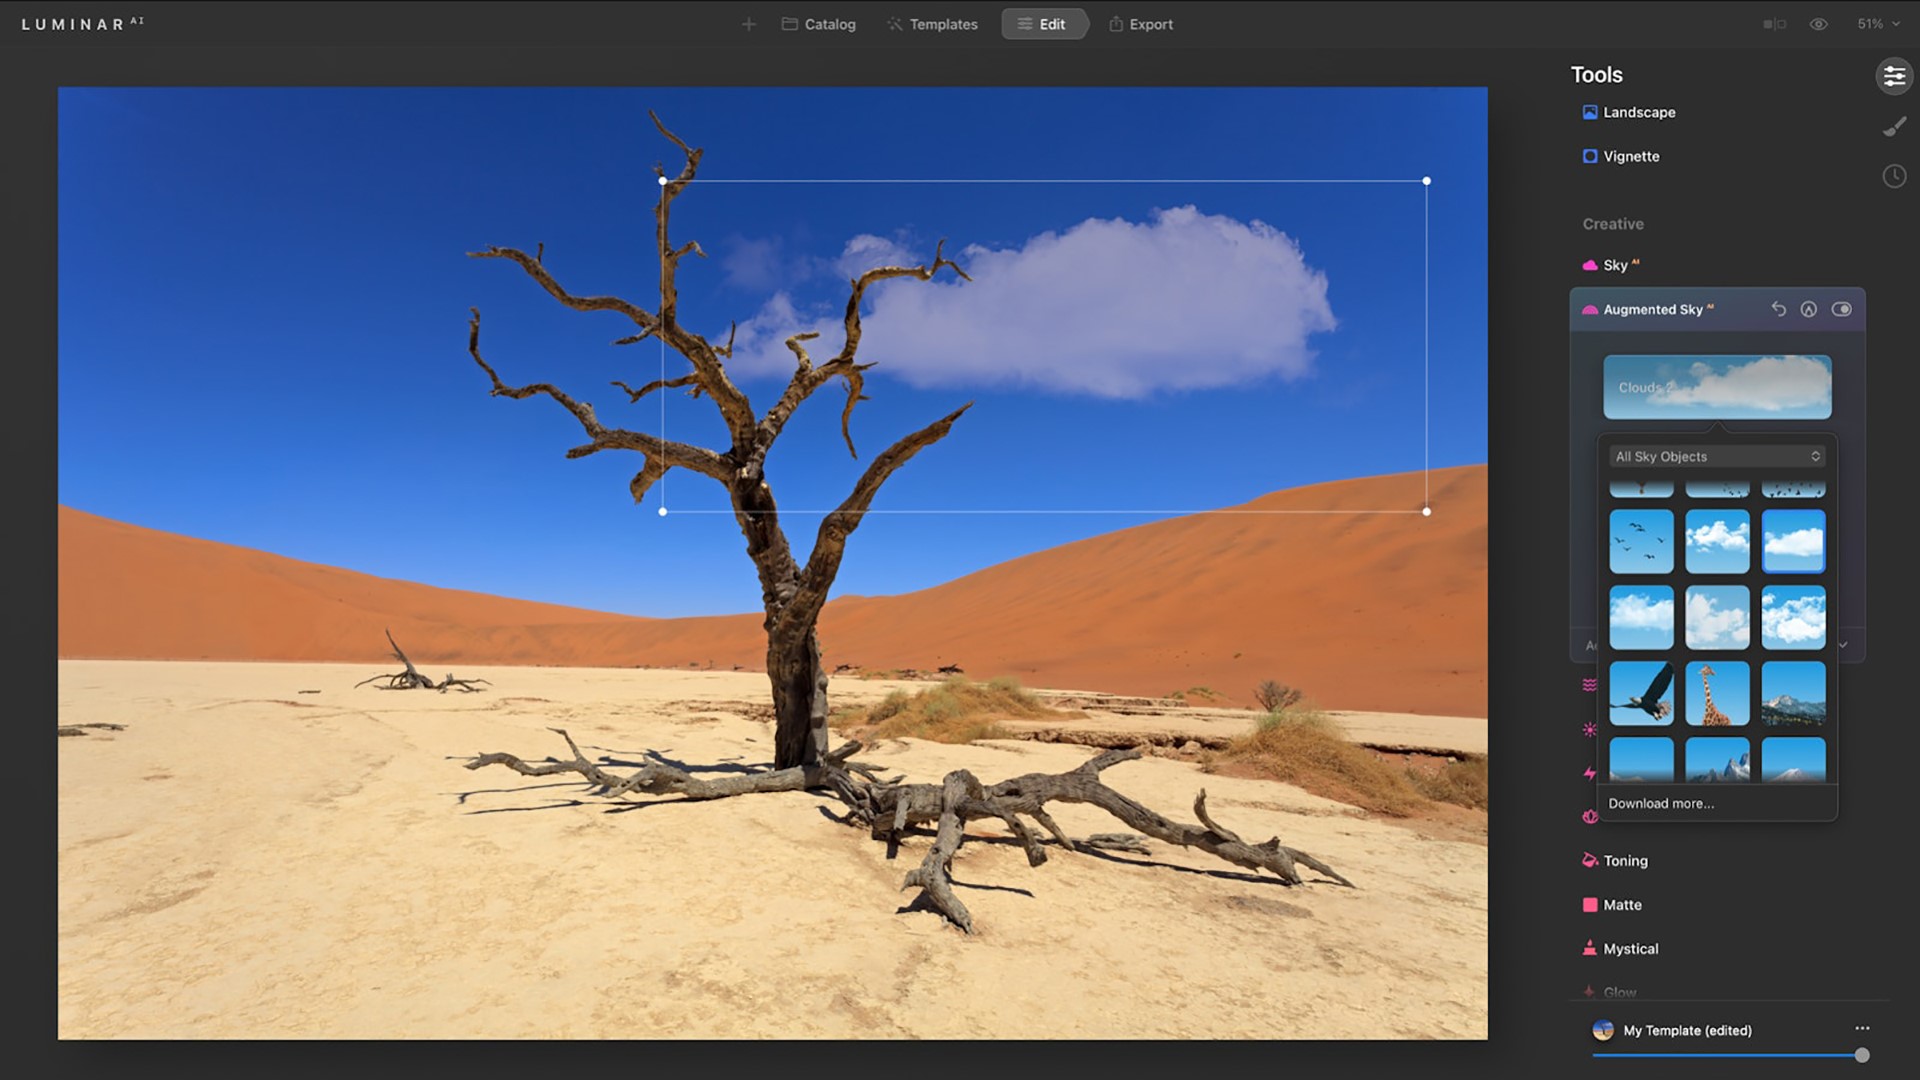
You can now instantly preview Sky Objects you add to the custom folder. Select any Sky Object in the visual browser to instantly preview it in your scene.
Just be aware that augmented Sky Objects will not be reflected in the water.
Convenient Template browsing

Templates are a great way to explore creativity. LuminarAI scans each image and can recognize more than 7,000 types of objects. It then offers editing suggestions based on image contents. For example, LuminarAI can recognize a dog in a photo and suggest Templates especially for pets. You can use these suggestions to finish your images quickly or as a starting point to get up and running.
Faster application launch time
This one is a real deal breaker for me.
There’s been improvements to the core engine that loads when you launch Luminar. So you should see reduced launch times when you startup the application.This will let you get to editing sooner.
Improved tools

- Dodge & Burn tool — Easily paint highlights and shadows in your photos to enhance the mood. And with the new Softness slider, you can subtly refine the edges of the affected area for a more natural result.
- Erase tool & Clone tool — Both of these tools offer non-destructive editing to easily remove unwanted objects or blemishes. Thanks to the Undo and Redo commands that are now available not only on macOS but also on Windows, there is no need to start over if you make a mistake or change your mind. Just undo the brushstroke and make fine adjustments.
Browsing Purchased Templates
In LuminarAI Update 3, you can now access your purchased Templates visually. Templates in the purchased tab are now organised in a grid so you can easily find and use them. Plus, you can use the “Get More Templates” button to find new Templates directly in LuminarAI.
Seen enough?
But wait there’s more:- New support for Apple hardware and image format
- Support for HEIC image format
- Bug Fixes and Minor Enhancements
Finally if you don’t have a copy of this software – now is the time to get it at a 25% discount.
Go to July 1 – 9th sales.
So, yes, you’ve only got to July 9th to get LuminarAI at this discount.
Go get it!
Share this:
-
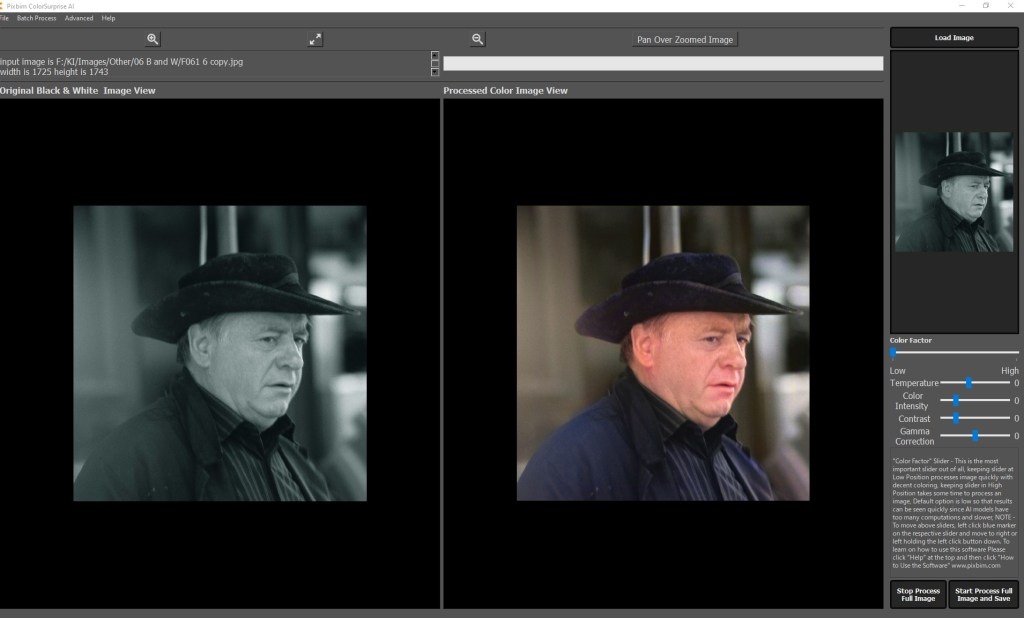
How to pre-process black and white photo in image editing software for Pixbim ColorSurprise AI
How to pre-process black and white photo in image editing software to get the best result from Pixbim Color Surprise AI.
You can use Irfanview, which is free, or any other image editor to get a better black and white photo before putting it through ColorSurprise AI.
Using Irfanview as Image Editor (Irfanview is free but does lacks complex features)
Two approaches are mentioned below Choose only one. Pixbim prefer the Gamma Correction approach.
1. Increasing Gamma.Increase Gamma to 1.5 (preferred) or 2.0 (on some dark images 2.0 gives a better colored results).
To change gamma in Irfanview, load an image in Irfanview and then go to “Image” at the top menu bar and then click “Color corrections”, move the “Gamma correction” slider and view the photo it shows in the new window and then press “OK”. Save the image so now you have a better black and white photo.
Now send this Gamma corrected black and white photo to ColorSurprise AI.
2. Increasing Contrast and BrightnessContrast should be good on black and white photo (around 50 seems to be a preferred one). To change contrast in Irfanview, load an image in Irfanview and then go to “Image” at the top menu bar and then click “Color corrections”, move the contrast slider and view the photo it shows in the new window.
Brightness should be good on black and white photo (around 50 seems to be a preferred one). To change brightness in Irfanview move the Brightness slider and view the photo it shows in the new window.
Press “OK” and then save the image so now you have a contrast increased and brightness adjusted black and white photo.
Using other Image Editor
When processing the JPG image, use a photo application to remove noise, scratches etc that might skew ColorSurprise. Crop frames or background (eg photo album or kitchen table) for the same reason.
For quick results, Pixbim have found that the auto-adjust in Irfanview option gives a good B&W image, sometimes better than fiddling with levels and contrast adjustmentsBelow are some of the important points to get a best quality digital black and white photo from existing black and white printed photos
You will probably be taking digital shots of an existing B&W print to input photo into Pixbim ColorSurprise AI.
It is important to get the best quality JPG image (this is lossy a compression) or PNG image(preferred).
Ideally, set up a tripod to get the sharpest photo of the print possible, which should be on a neutral background.
Take the shot in daylight to avoid color casts that might skew the ColorSurprise algorithm.
Save the image as the highest quality JPG possible or PNG. Those preliminary steps will result in the best starting point for processing the digital image in ColorSurprise AI.This useful and fun software is still available of at the price of US$39.99 plus if you use my discount code you get an additional discount.
Go to https://pixbim.com/color-surprise-ai-pixbim and enter the code KATINCSAI20 for a discountShare this:
-
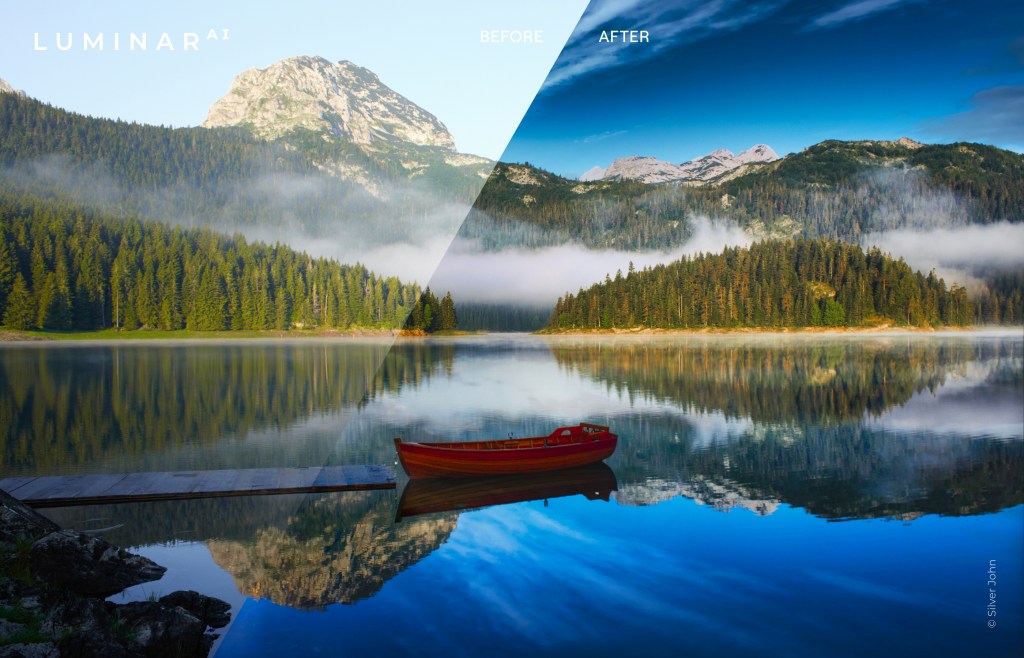
Photo editing with Luminar AI
I’ve been a Lightroom user for many years and in fact I was probably one of the early adopters.
Over time you become a bit complacent when use the same product. I was starting to think that it was time to look at another way to edit and organise my images that would improve the end result and at the same time improve my productivity.
So, when I first heard of Luminar a year or so ago, I bought it and have been playing around with it ever since.So I was about to post some info about Luminar 4 when Skylum introduced Luminar AI.
Whilst Luminar 4 is an editing program with some AI (artificial intelligence) built into it, Luminar AI is an AI program with a large selection of editing tools. So for the last 3 months or so I’ve been playing around with it and I’m impressed.Let me tell you where I’m coming from. I did a lot of editing but nowhere the amount I should do. I have RAW images that are sitting on my hard drive that, apart from the odd one, go back 10 years plus waiting for me to get off my arse and process!
You see, I have a love/hate relationship with editing and find that I’m going down a rabbit hole with it. I try and keep out of Photoshop and will try to use just Lightroom but it’s not always enough.
So when Luminar AI came along It seemed like a way of reducing my edit time (and consequently inspiring me to start processing my back catalogue). Enough of that.
Firstly, let me clarify that the info I will provide is for Luminar AI specifically the latest update 2. Secondly, I’m an affiliate so if you decide to buy through this link and use the code katinimages I’ll get a small payment.Over the next few weeks (could even be months) I’ll post a more articles on my experience and opinion.
So today is about comparing Luminar with Lightroom, as so many of us are Lightroom users.
One thing you need to consider is the difference in terms of price. Luminar is a once off payment for the software not a subscription.
Having said that new versions – as opposed to updates, are an additional cost.
I originally had Luminar 3 which I can still use but when Luminar 4 was released I had to pay for it, admittedly at a discounted rate as I was an existing owner (approx. 25%).How much is it? In USD it’s currently $89.00 (which you can get USD$10 off using this link and the code katinimages).
Adobe’s photography plan is USD$9.99 per month which is approx. $120 per year but you do get Photoshop as well as Lightroom plus a few other apps like LR Mobile and Cloud storage.
Having said that it’s not necessarily one or the other. It can be both as Luminar can be use as a plugin in both Lightroom and Photoshop.So, the differences between LR and Luminar AI are briefly as follows:
Luminar is a great AI software with a large selection of editing tools with some limited organising tools
Lightroom is an organising software with some really good editing toolsTo compare their organising ability let’s look at this chart
LR * LAI * Comment Folders Y 8 Y 9 L AI is easier to see Albums/Collections Y 9 Y 9 Keywords Y 8 N NA Coming in a future update of L AI? Captions Y 10 N NA Coming in a future update of L AI? Copyright Metadata Y 10 N NA Coming in a future update of L AI? Individual Image Edit Y 3 Y 8 Editing a single image in LR is possible but difficult because of its import requirements. It’s easy to do in L AI. Smart Previews Y 8 N NA A real differential if you edit images away from a remote drive Import tool Y 7 Y 9 L AI Import facility is very easy and quick due to it’s simplicity Export tool Y 9 Y 7 L AI is simple to use. LR gives you lots of preinstalled presets and the ability to create your own as well. Export to 3rd Parties Y 9 Y 3 L AI is Limited to SmugMug and 500PX and one image at a time Network Catalogue N NA Y 8 This is handy for me it means I can access the catalogue across my network from any computer that has L AI installed There are other differences that are not listed above but these are the main ones that I’ve encountered.
The keywords, captions and copyright is a big one for me. If I don’t edit an image in Lightroom then I have to enter these details into the platform I have exported to. In my case that’s SmugMug or WordPress. Alternatively once you finish editing you can export to your hard drive and then import to Lightroom for captions, keywords and other metadata like copyright.
I thought that using Lightroom to enter the metadata and then using Luminar as a plug in would be a workaround but unfortunately when you bring back the image to Lightroom it’s all gone. Likewise, flag, star or colour ratings are not retained either.
This means to use Luminar I’ve had to change my workflow.
With Lightroom my workflow was- Rate
- Import with copyright, and basic keywords
- Enter keywords, title and captions
- Edit
- Export
With Luminar AI I now:
- Import
- Rate
- Edit
- Export to SmugMug*
- Enter keywords, title and captions
OR
- Import to Lightroom
- Rate (if I want to)
- Export
Note. I don’t enter copyright. This is because the OMD1 MKII that I have has a facility for copyright to be entered on every image.
*The Keywords, Caption and title can be entered during export to SmugMug or 500PX if you want to avoid Lightroom. The beauty of using Lightroom is you can batch export to both SmugMug and 500PX
In summary, on the one hand, using Luminar AI has saved me some time as I now don’t rate every image and only enter keywords, title and captions to images that have been exported. On the other hand it’s restriction of only one image at a time can be exported to SmugMug is more time consuming.
That’s my way of handling the logistical differences between Lightroom and LuminarAI and may not work for everyoneBelow is a video brief summary of Luminar AI’s editing power:
In the next post I’ll review what Luminar AI is really all about and that’s it’s editing tools.
If you want to try for yourself then click on the this link and use the code katinimages to get a US$10 discount.Share this:
-
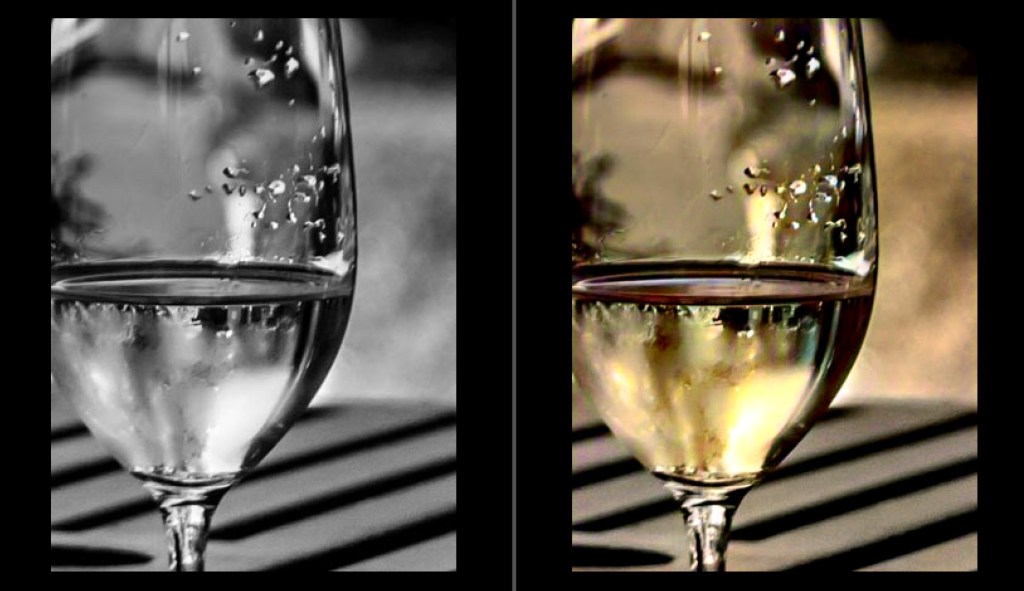
Black and White to Colour Made Easy

PixBim have been busy with an update on their Color Surprise AI. They’ve now given us the tools to fine tune any black and white colour conversion within the software itself.
New tools include Colour Temperature, Colour Intensity (Saturation), Gamma Correction, Contrast and a Brush! Plus much more and all for the same price of US$39.99 and if you use this coupon KATINCSAI20 you’ll get an extra 20% off.Go to https://pixbim.com/color-surprise-ai-pixbim and enter the code KATINCSAI20
Check out the video below:
Have you ever tried to convert a black and white to colour?
If you have, even if you’ve tried it with Photoshop, Lightroom or any other editing software you’ll know that it’s a painful process!
Well PixBim have this new software called colour surprise AI and it’s a beauty.
It makes colour conversion from black and white so easy!So, let’s take a look.
So this does is the heavy lifting for you. From here you can finetune in Photoshop afterwards or if you want to be a bit more creative you can use, for example, a lightroom plugin
Why would you convert a black and white in the 1st place?
Well you might have had a print or slide that was shot in black and white that would look good in colour. Maybe you shot some images in black and white as you can with some cameras and want to see what it looks like in colour.
Maybe you have an old print of grandma in her wedding dress you want to convert to colour.
If it’s the latter you probably won’t or need to fine tune it.
So how much is it?
Well it’s going to be US$79.99 but pixbim have an introductory special on for US$39.99 and if you use this coupon KATINCSAI20 you’ll get an extra 20% off.
Go to https://pixbim.com/color-surprise-ai-pixbim and enter the code KATINCSAI20
Thanks for reading this article
Do you see yourself taking some great travel photos that you can share or display?
Or can you see yourself reliving your travel experience by bringing home some emotive travel photos?
Maybe you aspire to getting your travel photos published.
If one or all of these is YOUR goal, I can help. Sign up in the box below to subscribe to my exclusive Travel Photo Tips Newsletter.
You’ll also get my free eBook “9 ways to improve your Travel Photography”.Remember if you want to take great travel photos
- that you can share and display.
- that help you relive your travel experience
- that give you a chance to have your travel photos published
then sign up below and subscribe to my exclusive Travel Photo Tips Newsletter and for your trouble get my eBook “9 ways to improve your Travel Photography”.
Share this:


