

If you been sitting on the fence about buying this editing software, then this could be a game changer for you.
Luminar AI’s fourth update gives us Precise Horizon Control in Sky AI, Improved Textures with visual preview and here’s the real deal breaker, Complete focus control with Portrait Bokeh AI.
So what does that all mean? Well let’s get the minor upgrades out of the way:
Precise Horizon Control in Sky AI
A new on-screen tool makes it even easier to control positioning of new skies when performing sky replacements with the Sky AI tool. In the Sky Orientation controls three sliders have been replaced by a single, intuitive Horizon Position control which makes accurate sky alignment easier for any of us.
Improved Textures with visual preview
You can now visually browse Textures in the dropdown list just like you can with Sky Selection and instantly have an idea of what your result might look like.
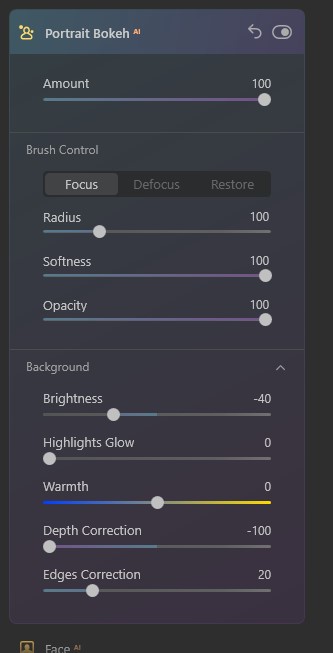
Now let’s talk about Portrait Bokeh AI
For those that are not familiar with the term Bokeh, it’s the blurriness you find in the background of a photo. For more about this go to https://en.wikipedia.org/wiki/Bokeh
Traditionally, creamy bokeh has always required expensive cameras and lenses. And has always been the main domain of full frame cameras.
There are ways of creating it with mirrorless and crop frame camera. And I know the iPhone and Android mobiles have software that can create it. Plus, you can go to Photoshop and create it too.
But Luminar AI’s Portrait Bokeh AI is something else.
Using artificial intelligence, Luminar AI can recognize people in a photo – even groups of people, and people posed in unusual positions. And then will automatically generate bokeh to a certain point, then it’s entirely controlled by you with a single amount slider. This allows you to create beautiful background blur in seconds – adding realistic and dreamy 3D bokeh effects to your portraits.
Lets’ take a look at it in practice.
Here’s one I took on a shoot that the client wanted me to shoot these employees in front of this tree. On the review of the pictures, they wanted a blurry background. Well, they were really to close to get the a strong bokeh effect. And I wasn’t about to retake it a few days later, so I did attempt it in photoshop and gave up. I just don’t have the time, attention to detail and to be totally honest the enthusiasm to spend an hour or 2 on one image.

So, let’s see how we go with Portrait AI
Go into edit mode then scroll down to the portrait section. The first section is portrait AI
Once you open that, you get straight into the first and important slider “amount”. Now you can see by moving this, you get a good control of the bokeh. Lets’ slide right over and see what happens. Pretty good.
The way it works is that it automatically masks humans (and just so you know it doesn’t work on anything else – yet).
So you are able to get some control of the mask with the brush control but I’m going to go down to the background section and slide the depth correction over to see if it helps blur the bottom of the planter box that is still in focus.
Now we can go back to brush control and tidy it up.
Boom done.
To me that’s more than impressive that’s something every photographer has wanted in their armour for decades.
So, if you are still not sure about buying this software Luminar AI Portrait Bokeh should convince you. And that to the many more AI updates they have planned and you’ll have a great product to make your editing life so much easier.
Go to Luminar AI to grab it and make your life a lot easier when editing photos.


Leave a comment