
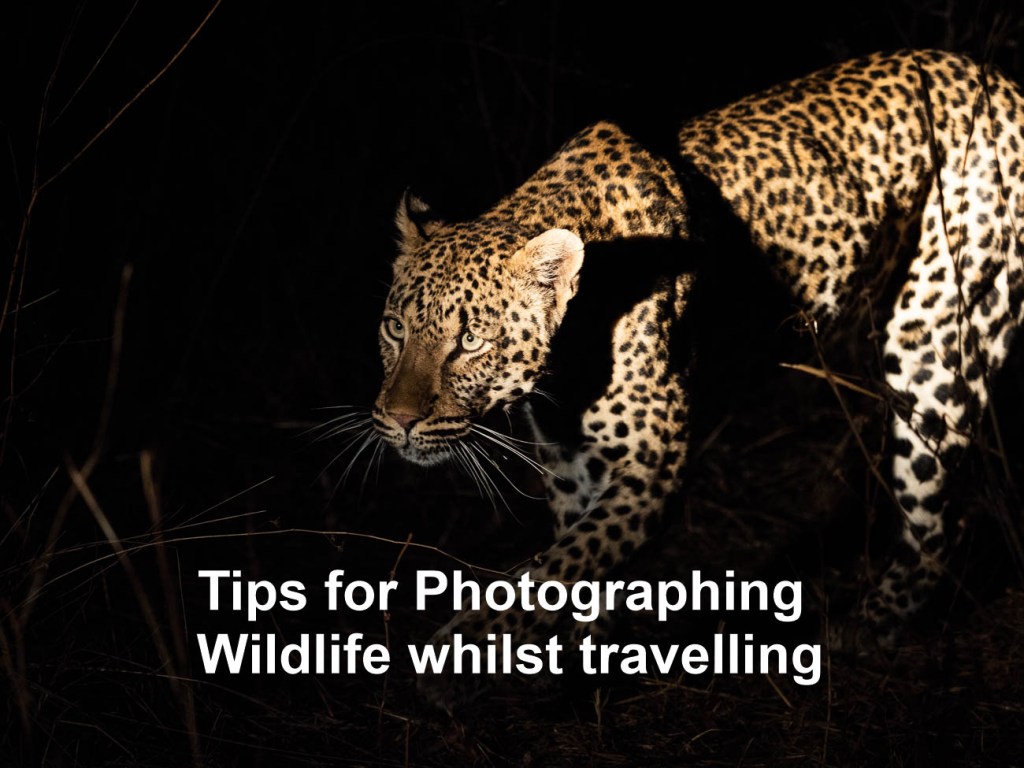

In Tips to Prepare for Photographing Wildlife while Travelling I gave you some handy tips on preparing for photographing wildlife while travelling. Now it’s time to give you some tips on actually photographing wildlife whilst travelling.
So if you have read Tips to Prepare for Photographing Wildlife while Travelling you will know what sort of wildlife you may get an opportunity to photograph whilst you are on your travels.
As I stated in the previous article travellers like us will never reach the level of expertise of a wildlife photographer. Of course, if you aspire to be a wildlife photographer that’s different. But in general, there are photographers out there who specialise in photographing wildlife. They are meticulous in their preparation. They leave almost nothing to chance, have lots of patience and spend a huge amount of time trying to get that “shot”.
So now to the tips
Basic equipment.
1. Zoom or Telephoto lenses. This is non-negotiable. Sure you can take pictures without a zoom if you have a long fixed or prime lens. But that’s restrictive as you can only be a set distance away. Having a long zoom of at least 300mm (in 35mm) gives you flexibility.
2. Either a DSLR or Mirrorless camera so you can swap out lenses. You also get better control of the exposure and focus with an interchangeable lens camera.
3. Smartphone? Well unless you going to get really close, which in most cases is not recommended, leave it for the happy snaps.
4. If you want to get serious get a fast write speed memory card. Nothing worse than shooting away only to find the camera is buffering.
5. Weather protector like a hood or a Rain and Dust Cover for your camera. Going on safari or wildlife spotting can often be dry and dusty or wet and raining. Don’t forget to protect the rest of your gear as well. Most backpacks come with rain covers that offer a reasonable amount of protection against both the rain and dust.
Settings:
1. Aperture Set to wide open (lowest F-Stop). And on Aperture priority (A). Why?
A couple of reasons:
You want to make sure that you eliminate any background distractions as much as possible.
You also want to allow plenty of light in. See also no 2.
2. ISO
Set to auto
Even in the tropics or sub tropics, light can vary from bright sunshine to dark shadows. More often than not, animals tend to be in the shadows. Where it’s quite dark you may need to override the auto and set the ISO to an even higher setting.
3. Shutter
As you should have the camera set on Aperture priority the shutter will take care of itself. Unless of course you are looking to try some advanced motion techniques which is outside the scope of this article.
4. Focus
Think you can take wildlife photos with your camera set to manual focus? Think again!
You need your focus set to auto. Animals are always on the move. Even if they are lying down, they can jump up quickly leaving you struggling to maintain focus on auto, let alone manual

5. Frame Speed
Set your frame speed to continuous or sequential or whatever your camera’s equivalent is. You’ll need to do some controlled spray and pray in some instances.
Note: Check the camera default setting for continuous. I didn’t check the number of frames per second on a new camera. I ended up with 100 shots of an elephant hardly moving, as the default setting was 60FPS.
Last tip: GET UP CLOSE
There are some basic rules in getting up close to wildlife:
1. Be very careful in choosing what wildlife to get close to. They are WILDlife which means they can be unpredictable. So stay safe
2. Where possible use a telephoto lens to get a close up shot.
3. Be quick. Wildlife is always on the move. If you are close you will need to have your wits about you. It’s easy to get distracted when you are behind the camera.
4. Consider using a shutter speed of 1/250 to reduce the chance of blur
5. As I mentioned in point 5 of the previous section, it’s worth setting your frame speed on continuous or sequential.
6. Sometimes the wildlife is behind a fence or in a cage, or you are the one in a cage or compound, as I’ve experienced. In these cases, it is possible to reduce or totally eliminate the wire of a fence or cage in a photo, by going up close. Same applies to any glass enclosures found mostly in Zoos. Get up close and have your lens, or lens hood, touching the glass to reduce reflections.

Extra tip on this one is that you can also use a polariser filter to reduce reflections
For more about getting in close go to The One Big Creative Travel Photo Idea
Summary of 16 Tips for Photographing Wildlife whilst travelling
· Unless you are prepared to invest in a lot of time and patience it is extremely unlikely that you will consistently take ‘National Geo” quality photos
· For best results use an interchangeable lens camera with a Zoom lenses
· In most cases it’s best to have a wide-open aperture (small F-Stop), ISO set to auto, Focus on Auto and Frame speed should be set to continuous
· Get in close, if not physically then with your telephoto zoom lens
Thanks for reading this article
Do you see yourself taking some great travel photos that you can share
or display?
Or can you see yourself reliving your travel experience by bringing home some
emotive travel photos?
Maybe you aspire to getting your travel photos published.
If one or all of these is YOUR goal, I can help. Sign up in the box below to
subscribe to my exclusive Travel Photo Tips Newsletter.
You’ll also get my free eBook “9 ways to improve your Travel Photography”.
Remember if you want to take great travel photos
- that you can share and display.
- that help you relive your travel experience
- that give you a chance to have your travel photos published
then sign up below and subscribe to my exclusive Travel Photo Tips Newsletter and for your trouble get my eBook “9 ways to improve your Travel Photography”.


Leave a comment